- Published on
Intrusion detection and observability in cyber security labs with PFSense, Snort, Vector, Loki and Grafana
- Authors

- Name
- Peter Peerdeman
- @peterpeerdeman
Now that we have set up our virtualised cyber security lab in proxmox, we should get some visual insights into the the intrusion detection system. We are going to leverage PFSense's alert logging, put these logs into Loki and then create dashboarding panels in Grafana. The components in short:
- Alert Log source (produced in PFSense as rsyslog logs)
- A log transformer (Vector)
- A log aggregation system (Loki)
- A dashboard (Grafana)
To extract the alert logs from PFSense, we will configure PFSense to use RFC-5424 compliant system logs and send these logs to a remote log server using the Status / System Logs / Settings tab, as explained in the remote logging docs. Before we can specify the ip and port of the remote syslog, we should first set up that application.
Storing the logs in Loki
First, we'll need to setup the database that will store the logs, and then set up the application that will receiving the syslogs, transform them and store them in the logging database. I went through several configurations, including syslog-ng and alloy but eventually ended up with datadog's Vector to process the logs and Loki to store the logs.
Loki can be setup in a plethora of ways, ranging from simple single binary to infinitely scalable microservices. For my setup I settled with a simple docker compose installation:
services:
  loki:
    container_name: loki
    image: grafana/loki:3.1.0
    user: root
    ports:
      - "3100:3100"
    command: -config.file=/etc/loki/local-config.yaml
    volumes:
      - "/home/peter/loki/data:/loki"
Pushing rsyslog into Loki with Vector
Because loki can't receive the rsyslog format directly, we need an application that receives rsyslog and transforms that data and outputs to Loki. For this log aggregation I will be using Vector on the Kubernetes cluster. When you are getting started with Vector, be sure to read their awesome quickstart tutorial, showcasing their generate_syslog debug resource, that enables you to check if your sinks are setup properly before you try connecting your actual syslog source.
In this case, we specify a source that receive syslog on UDP port 513 and a sink that receives the syslog source and sends it to the loki endpoint
sources:
  syslog:
    type: syslog
    address: 0.0.0.0:513
    mode: udp

sinks:
  loki:
    inputs:
      - "syslog"
    type: "loki"
    encoding:
      codec: json
    labels:
      service: pfsense
    endpoint: "http://192.168.0.5:3100"
You could set up Vector with docker compose, but in this case I opted for a deployment in my k8s cluster. I downloaded the Vector helm chart values file and added the above configuration under the customConfig:, and then installed with helm install vector vector/vector -n monitoring -f values.yaml. This results in Vector getting installed, including a nice ConfigMap object for the configuration on the Kubernetes cluster.
...
customConfig:
  sources:
    in:
      type: syslog
      address: 0.0.0.0:514
      mode: udp
...
Explore the logs in Grafana
Now PFSense sends logs to Vector and Vector pushes them to Loki, we can finally start visualising the logs using Grafana. If we install Grafana with a version 11.0.0 or higher, and use a specific GF_INSTALL_PLUGINS environment variable (like in the example of the docker compose configuration below), we can use the public preview of the explore logs plugin to visualise our Loki logs.
services:
  grafana:
    ports:
      - "3001:3000"
    volumes:
      - /home/peter/grafana/data:/var/lib/grafana
    environment:
      GF_INSTALL_PLUGINS: 'https://storage.googleapis.com/integration-artifacts/grafana-lokiexplore-app/grafana-lokiexplore-app-latest.zip;grafana-lokiexplore-app'
    restart: always
    container_name: grafana
    image: grafana/grafana:11.0.0
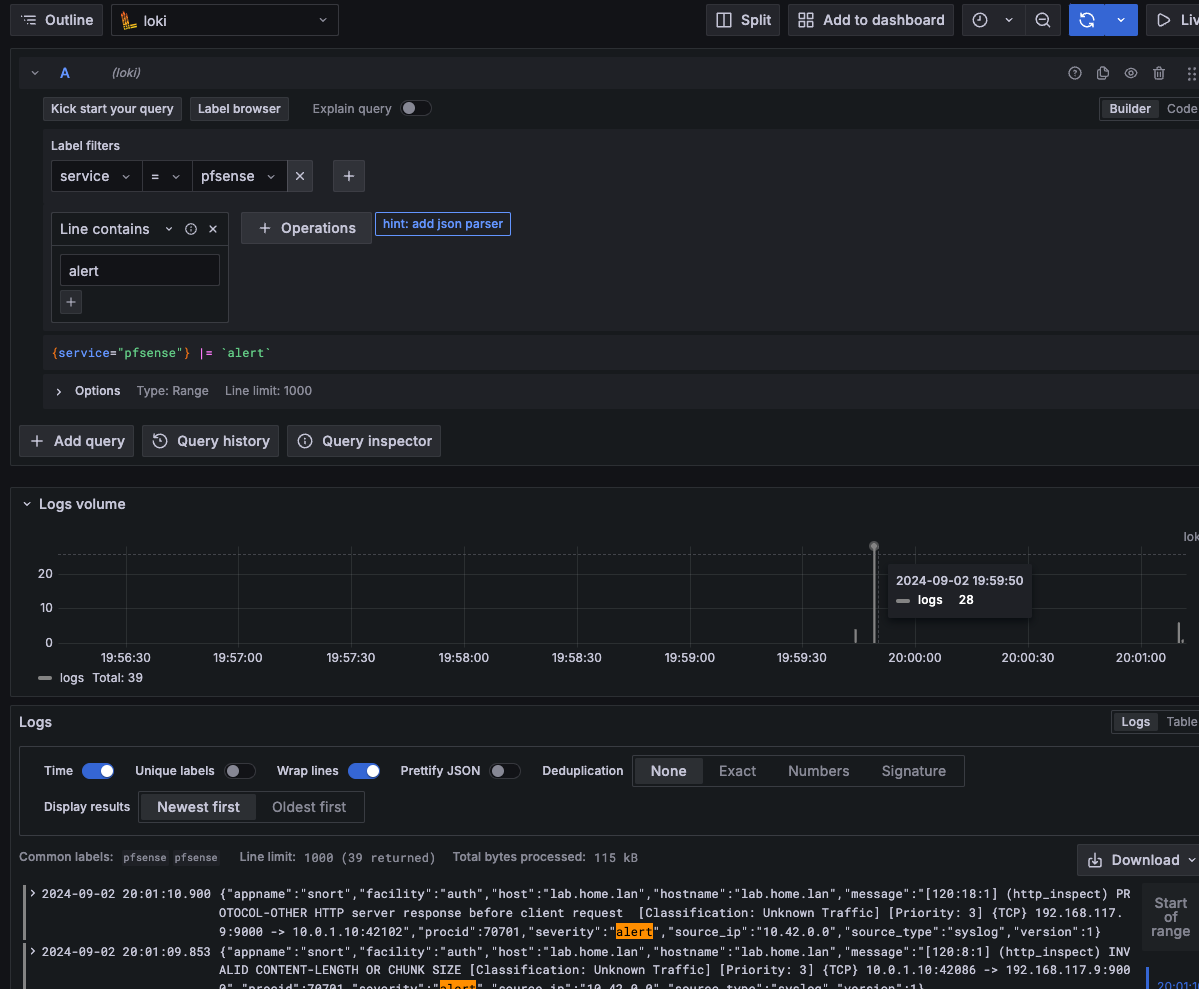
If we open grafana's explore view and select our loki datasource, we should now be able to explore our log lines. I used the query builder to make a label filter for "pfsense" and a match lines with the keyword "alert". This results in the logql query {service="pfsense"} |= "alert". I especially like the logs volume graph, that shows a visual representation of how many log lines were counted over time, allowing us to turn our log lines into observable metrics.
In the next blog of this intrusion detection logging series we will enhance the dashboard, create some metrics from log messages and throw some metrics into the mix.