- Published on
Raspberry Pi + Arduino weatherstation with PebbleJS interface
- Authors

- Name
- Peter Peerdeman
- @peterpeerdeman

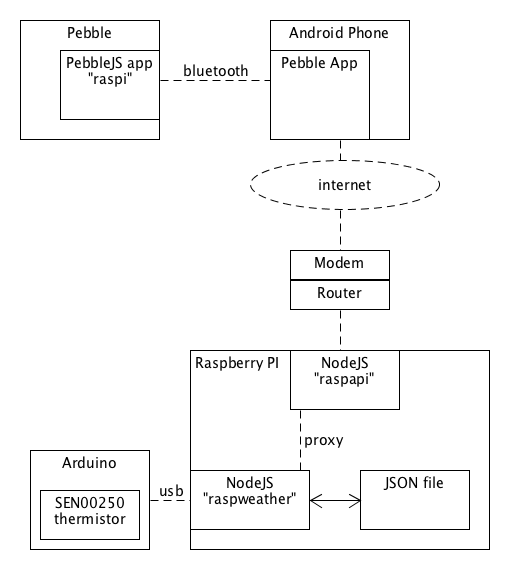
In my one of my latest hobby projects I've been fiddling around with some Raspberry Pi, Arduino and PebbleJS stuff. I thought it would be a nice idea to start measuring the temperature in our living room, visualise this data through a nice graph on a webserver and also be able to monitor this data wherever I am through my Pebble smart watch. And so it began, with the following architecture as result:

RaspAPI: The API hub to the outside world
In order to access my data from anywhere on the internet, I needed a hub application that would aggregate all of my home-automation data and features. The result is RaspAPI, a super light NodeJS express server that is responsible for all the publicly available routes into my home automation system. The first case was a "TOP" module, a route that would expose the current processes on the Raspberry PI through the /top path. The route for the weather station is a simple proxy to a separate nodejs application:
var express = require('express');
var request = require('request');
var router = express.Router();

router.all('/*', function (req, res) {
    var url = 'http://127.0.0.1:1234' + req.url;
    req.pipe(request(url)).pipe(res);
});

module.exports = router;
RaspWeather
RaspWeather Is an application running on the Raspberry Pi that focusses purely on collecting, storing and exposing the weather data measured by the Arduino board connected through USB. Because the Arduino does not have a REST api, the data has to be read through a "serial port". Through a quick and dirty use of the serialport npm module, I'm reading the data from the serialport, and writing the temperature float and timestamp to a text file every hour:
serialPort.open(function(error) {
if (error) {
console.log('failed to open: ' + error);
} else {
console.log('now logging temperatures to file');
serialPort.on('data', function(data) {
var stringData = data.toString();
var split = stringData.split(':');
if (split.length > 0) {
var temperatureFloat = parseFloat(split[1]);
if (temperatureFloat) {
var now = new Date();
if (now - lastTimeStamp > 1000 _ 60 _ 60) {
var logEntry = new Date().toString() + ';' + temperatureFloat + '\n';
fs.appendFile('temperatures.txt', logEntry, function(err) {
//
});
console.log(temperatureFloat);
lastTimeStamp = now;
}
}
}
});
}
});
Next to reading and writing the data, the RaspWeather application exposes the contents of the temperatures file through a simple express web api. The API allows a limit query parameter that will allow me to retrieve more than just the last 24 readings when needed:
/\* Get temperatures

-   @param limit number of temperatures, max 24*7
    */
    app.get('/temperatures', function(req, res) {
    var limit = 24;
    var filename = 'temperatures.txt';
    if (req.query.limit && parseInt(req.query.limit)) {
    limit = Math.min(parseInt(req.query.limit), 24 _ 7);
    }
    fs.readFile(filename, 'utf-8', function(err, data) {
    if (err) throw err;
    var lines = data.trim().split('\n');
    var lastLines = lines.slice(-1 _ Math.abs(limit));
    var result = lastLines.map(function(line) {

                var fields = line.split(';');

                var date = fields[0];
                var temperature = parseFloat(fields[1]);
                return {
                    date: date,
                    temperature: temperature
                };
            });

            res.json(result);
        });

    });

app.use(express.static('public'));

var server = app.listen(1234, function () {
var host = server.address().address;
var port = server.address().port;

console.log('Temperature webserver listening at http://%s:%s', host, port);
});
Arduino temperature reading
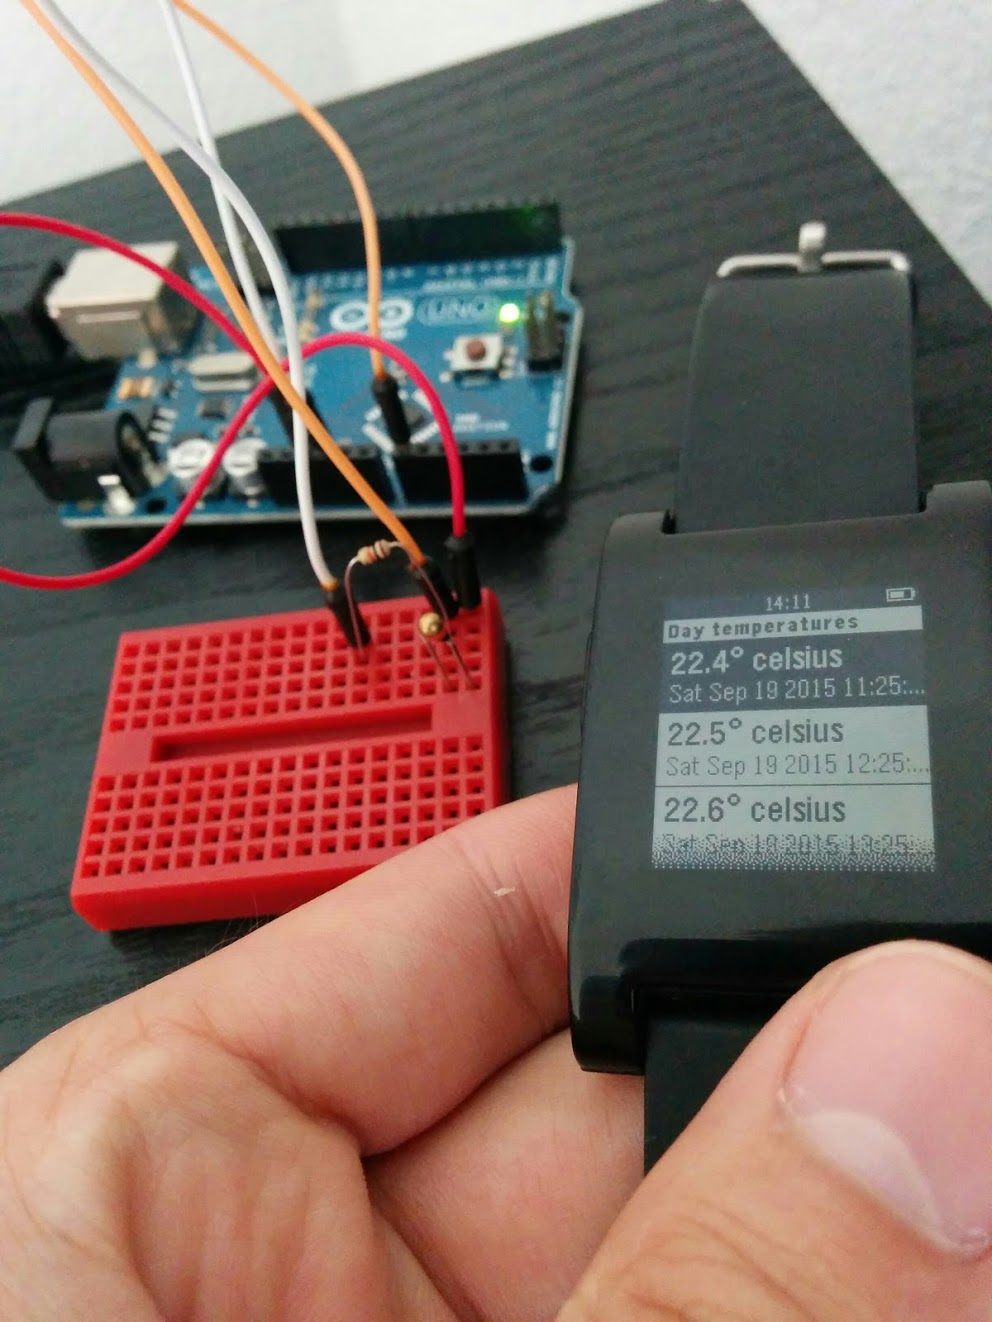
The Arduino board has a SEN-00250 thermistor wired to an analog pin and just sends out a temperature value every couple of seconds. I found this script on the Arduino Playground Thermistor2 page that gave a pretty accurate temperature reading to the USB port, that we have seen gets read through the serialport:
void loop() {
float temp;
temp=Thermistor(analogRead(ThermistorPIN)); // read ADC and convert it to Celsius
Serial.print("Celsius: ");
Serial.print(temp,1); // display Celsius
//temp = (temp \* 9.0)/ 5.0 + 32.0; // converts to Fahrenheit
//Serial.print(", Fahrenheit: ");
//Serial.print(temp,1); // display Fahrenheit
Serial.println("");
delay(5000); // Delay a bit...
}
pebble-raspi PebbleJS application
The final part of the project is displaying the temperature on my pebble smartwatch using my pebble-raspi application. The most approachable way to run code on the pebble is using the CloudPebble platform. CloudPebble allows you to write simple dataviews in javascript and push the code to your pebble remotely. The following piece of code is the snippet that retrieves and renders the temperature on the pebble (for full example including all of my other pebble-raspi features, check the github repo)
var temperatureMenu = new UI.Menu({
    sections: [
        {
            items: [
                {
                    title: 'current temp inside',
                },
                {
                    title: 'day temp inside',
                },
            ],
        },
    ],
});

temperatureMenu.on('select', function (e) {
    if (e.itemIndex === 0) {
        // current
        ajax(
            {
                url: RASPAPI_URL + '/api/weather/temperatures?limit=1',
                type: 'json',
            },
            function (data) {
                console.log('data', data);
                var currenttemp = new UI.Card({
                    title: data[0].temperature + '° celsius',
                    subtitle: data[0].date,
                });

                currenttemp.show();
            }
        );
    } else if (e.itemIndex === 1) {
        // daytemp
        ajax(
            {
                url: RASPAPI_URL + '/api/weather/temperatures',
                type: 'json',
            },
            function (data) {
                var menuItems = parseTemperaturesFeed(data);
                var resultsMenu = new UI.Menu({
                    sections: [
                        {
                            title: 'Inside temperatures',
                            items: menuItems,
                        },
                    ],
                });
                resultsMenu.show();
            }
        );
    }
});
temperatureMenu.show();
All the sourcecode of this project can be found in the following repositories: